
A Boca printer can print logos, images, and graphics on your ticket. Before printing images, you must first determine which data format your software uses to send ticket data to the printer: WYSIWYG or RAW FGL. If you are unsure, contact your software supplier.
WYSIWYG – What You See Is What You Get. This method uses a print driver to send data to the printer. This is like taking what is on your computer screen and printing it on a printer. Some web-based software providers would create a PDF, DOC, XLS, HTML or similar document and send it to the printer via the print driver is assents as an graphic data.
When using this method the image should be added to the layout in the software similar to the other objects printed by the software. The Boca printer will only print black therefore for the best result it is advised to make the image black and white. Grayscale or full color are possible, but the printer driver will have to try to convert this image into a gradient of black dots to mimic the different colors, which often does not produce the desired print result.
To optimize your print out, you may want to try to change the half-toning setting in the printer driver. Lower the print speed.
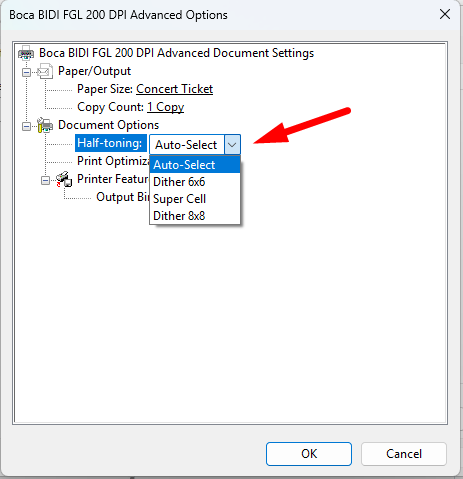
RAW FGL – This method sends FGL software commands to the printer to arrange the data on the ticket. In this format many software providers send the data directly to the printer’s interface port. If the BOCA print driver is being used it may be put in RAW mode to pass the FGL data through (this is controlled by the ticketing software) and not interpret into graphic data.
New FGL46-level printers support the downloading / printing of 1-bit black & white BMP, PCX or PNG (since 2025) graphic images to the printer. Older FGL46 printers may not support all file types, printers build before 2024 do not support PNG files.
The image must be:
- in BMP, PCX or PNG file format
- 1-bit black & white monochrome; no color, no greyscale
- In the resolution of your printer 200dpi, 300dpi or 600dpi, see BOCA self-test ticket explanation.
- In the exact size you need it to be printed on your ticket, this is best measured in dots.
For reference 200dpi ~ 8 dots per mm; 300dpi ~ 12 dots per mm; 600dpi 24 dots per mm - In the orientation you need it to be printed, where the feed direction is from left to right
The image file needs preceded with by small FGL string to print directly, like the following command strings:
<SP#,#><pcx><G#>pcx bytes
or
<SP#,#><bmp><G#>bmp bytes
or
<SP#,#><png><G#>png bytes
explanation of the commands
<SP#,#> = where you want the image printout
<bmp> = let the printer know an bmp image will be sent to it. (<png> = PNG, <pcx> = PCX)
<G##> = the number of bytes the image has.
Send the byte of BMP image file to the printer.
To download the BMP, PCX or PNG file for use later on as a logo, follow the same procedure as above but send an esc character (27d) both before and after the BMP or PCX data stream. You can leave out the positioning command <SP#,#>
esc<pcx><G#>pcx bytes esc
or
esc<bmp><G#>bmp bytes esc
or
esc<png><G#>bmp bytes esc
This image can then be printed using the normal logo printing commands like <SP20,20><LD1><p> where 1 is the ID number of the stored logo.
To download a logo into your printer, you may also use the Windows based program that allows customers to communicate from a host computer to the printer. This is explained is the following article: Downloading a logo with Windows Configure and Test Program
For more information, please see the Downloading File Supplement, the Downloading Logo Supplement, the Downloading BMP, PNG & PCX Supplement in the Programming Guide.